CRUD operations
This tutorial is designed to help the users to make the first steps using UD. We want to go trough the whole process of creating a simple but working application using UD.
Step 0: Setting the system up
The tutorial has been designed in order to take advantage of docker so setting it up is relatively easy. In order to set the system up, you need just to download a copy of the complete excample from the GitHub repository and run the command:
docker-compose up -dYou can have a better description of the process check out the page Setting the system up.
Where are my resources located
Designing an application, in UD terms, means to create a set of json files, or resources, we need to put in src/Custom/Json/ folder. In order to be accessible from the system the specifyed resources need to be linked using an index file.
In this case my index file will be the following:
{
  "name": "index",
  "metadata": { "type":"index", "version": "1" },
  "scripts": [
    { "path":"./Custom/Json/groups/author.json", "type":"group", "name":"author" },
    { "path":"./Custom/Json/articles/articlestable.json", "type":"table", "name":"articlestable" },
    { "path":"./Custom/Json/articles/newarticleform.json", "type":"form", "name":"newarticleform" },
    { "path":"./Custom/Json/articles/editarticleform.json", "type":"form", "name":"editarticleform" },
    { "path":"./Custom/Json/articles/deletearticletransaction.json", "type":"transaction", "name":"deletearticletransaction" }
  ]
}
The list of files you see here is the list of resources we are going to create in order to implement our system.
Step 1: Create a group of users
The first thing we need to do is to create a group of users. Each application has grups of users with different access level to the different features of the application. We need to define those groups.
A group is defined by a json file with type set to group. Each group has a name, a default action and a menu.
For each group we need to define the default action, that is the action triggered once we go trough the login process and the menu this specific group is going to use in order to navigate the application.
{
  "name": "author",
  "metadata": { "type":"group", "version": "1" },
  "defaultaction": "articlestable",
  "home": { "label":"My app", "action":"#" },
  "menu": [
    {
      "label":"Articles", "icon":"asset",
      "submenu": [
        { "label":"Articles", "resource":"articlestable" },
        { "label":"New article", "resource":"newarticleform" }
      ]
    }
  ]
}
In this case we define just one menu item with two sub items:
- Articles: a link the a table that shows all aticles in the system
- New article: a link to a form that allows this group to insert a new article in the system
For more information about the group file syntax please check out group docs page.
Create a list of articles
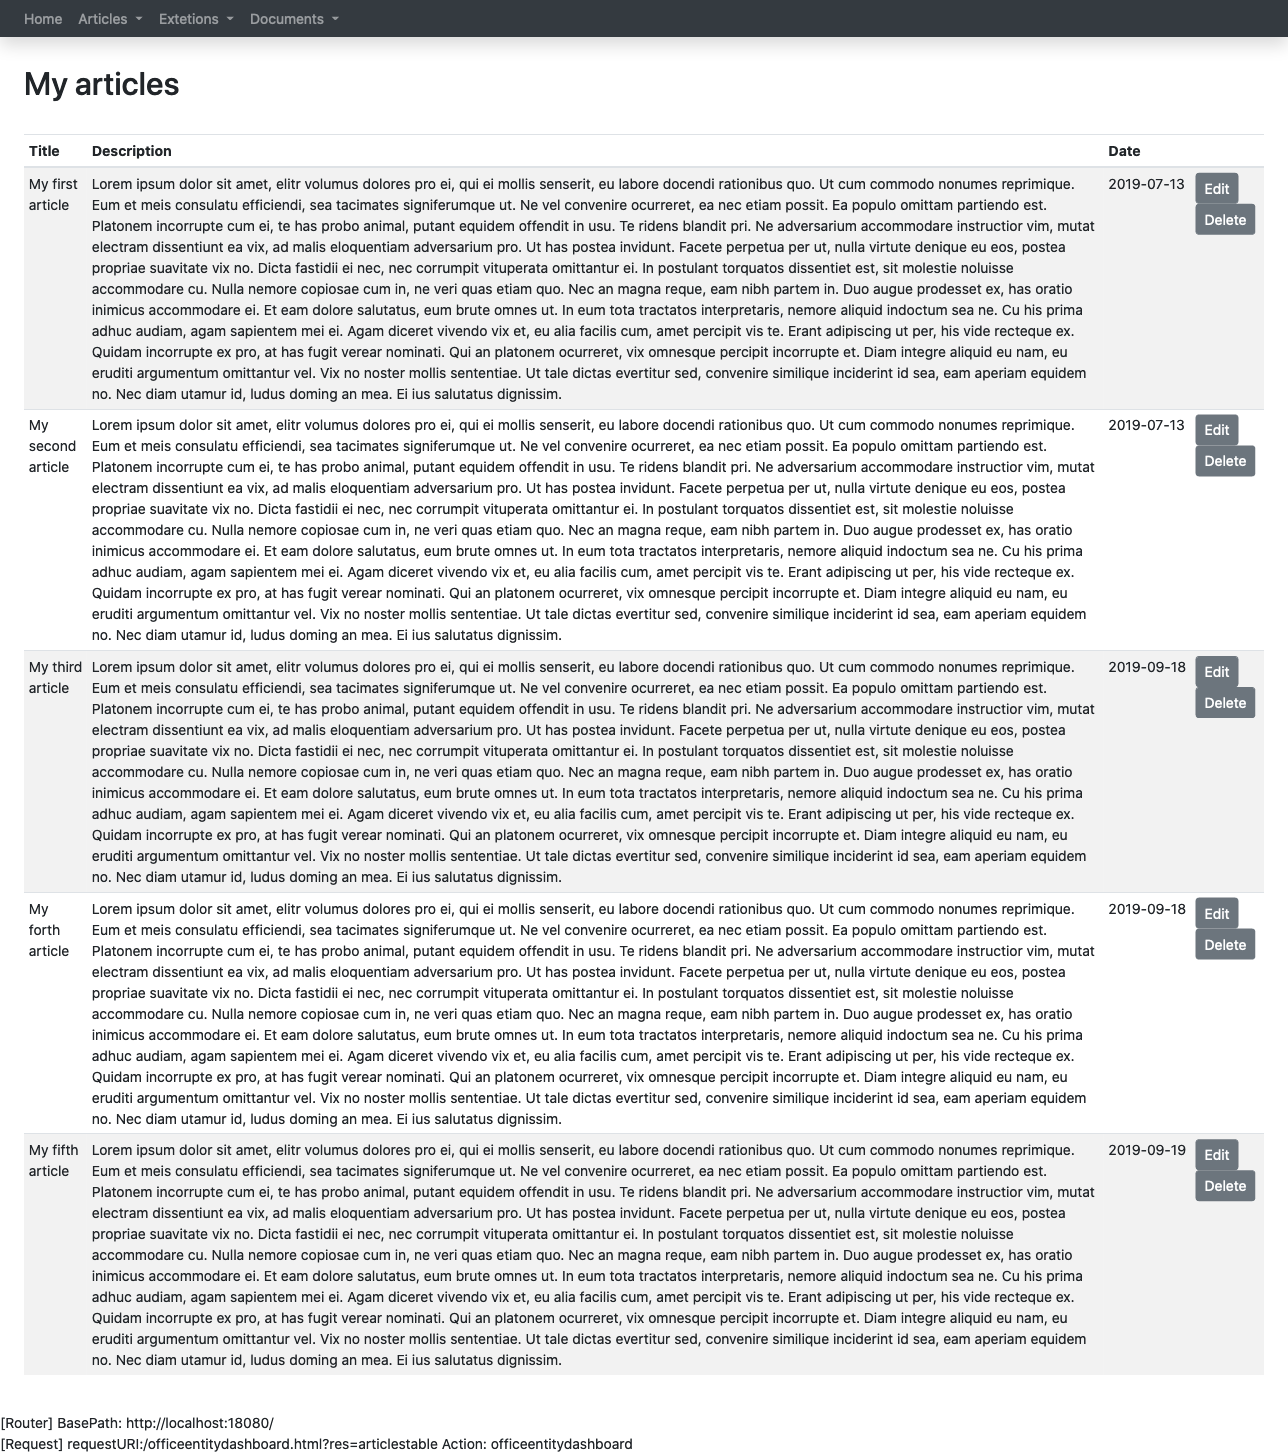
We need to give to the users that belongs to the authors group the possibility to see all articles previously saved in the database. In order to do that we need to define a table.
This resource is named: articles
Only the users that belongs to group author can access to this resource.
When a user access this resource, the system performs the SQL query: SELECT id, title, description, created FROM articles;
Then a table is composed, having 4 columns:
- Title: it shows the content of field title
- Description: it shows the content of field description
- Date: it shows the content of field created
- Actions: it show all action related to a specific article composing a link that contains the content of field id.
{
  "name": "articlestable",
  "metadata": { "type":"table", "version": "1" },
  "allowedgroups": [ "author" ],
  "get": {
    "request": {
      "parameters": []
    },
    "query": {
      "sql": "SELECT id, title, description, created FROM articles;",
      "parameters":[]
    },
    "table": {
      "title": "My articles",
      "topactions": [
        { "label": "New", "resource": "newarticle" }
      ],
      "fields": [
        {"headline": "Title", "sqlfield": "title"},
        {"headline": "Description", "sqlfield": "description"},
        {"headline": "Date", "sqlfield": "created"}
      ],
      "actions": [
        {"label": "Edit", "action": "editarticleform", "parameters":[{"name": "id", "sqlfield": "id"}] },
        {"label": "Delete", "action": "deletearticlelogic", "parameters":[{"name": "id", "sqlfield": "id"}] }
      ]
    }
  }
}
Create a form to insert a new article
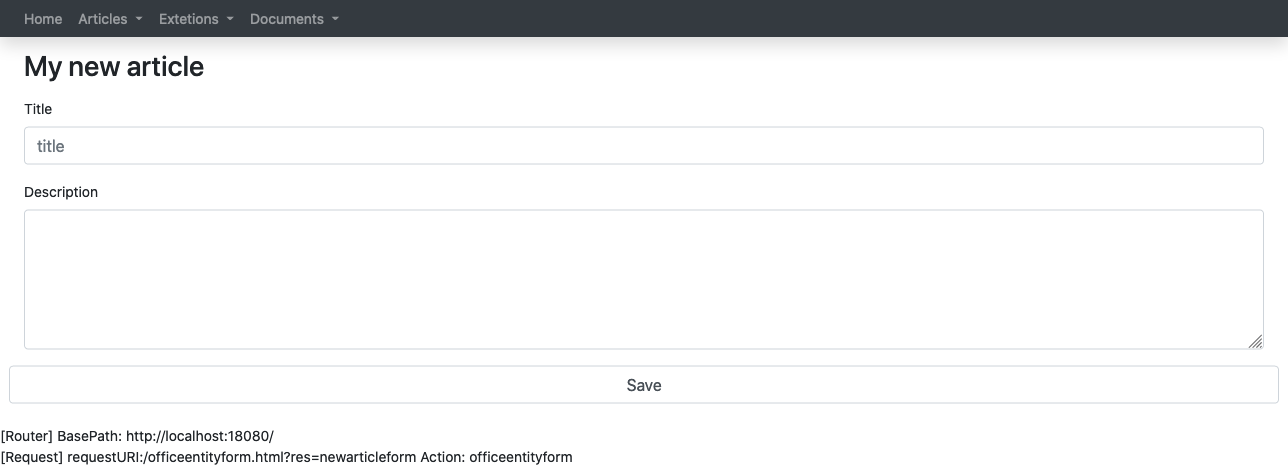
The top actions of the table and the menu we defined for the author group contain a link to the resource newarticleform. This resource is a form that allows the authors to type a new article and save it on the database.
In this case too, only the users that belongs to group author can access to this resource, then we need to add to the allowedgroups array the group name author.
This form is composed by a get section and a post section.
The get section, is going to visualise the html form in order to allow the author to input the data, the post section is going to validate the received data and contains the SQL queries that transfer that data in the database.
The html form we are defined in the get section is composed by two fields:
- title: text field
- description: textarea
At the end there is the submit button with the save label.
The post section receives the post parameters sent by the form (title and description) sets the validations rules for those parameters and performs a query in the database in order to save the data.
Validation rules:
- name: required max_len,250
- description: alpha_numeric
Query: INSERT INTO articles ( title, description, created ) VALUES ( :title, :description, NOW() );
Query parameters:
- title: post parameter
- description: post parameter
A complete example
{
  "name": "newarticleform",
  "metadata": { "type":"form", "version": "1" },
  "allowedgroups": [ "author" ],
  "get": {
    "form": {
      "title": "My new article",
      "fields": [
        { "type":"textfield", "name":"title", "label":"Title", "placeholder":"title", "width":"12", "row":"1" },
        { "type":"textarea", "name":"description", "label":"Description", "placeholder":"Description", "width":"12", "row":"2" },
        { "type": "submitbutton", "width":"2", "row":"3", "name": "Save", "constantparameter": "Save" }
      ]
    }
  },
  "post": {
    "request": {
      "postparameters": [
        { "name":"title", "validation":"required|max_len,250" },
        { "name":"description", "validation":"alpha_numeric" }
      ]
    },
    "transactions": [
      {
        "sql":"INSERT INTO articles ( title, description, created ) VALUES ( :title, :description, NOW() );",
        "parameters":[
          { "type":"string", "placeholder": ":title", "postparameter": "title" },
          { "type":"long", "placeholder": ":description", "postparameter": "description" }
        ]
      }
    ]
  }
}
Create a form to update an article
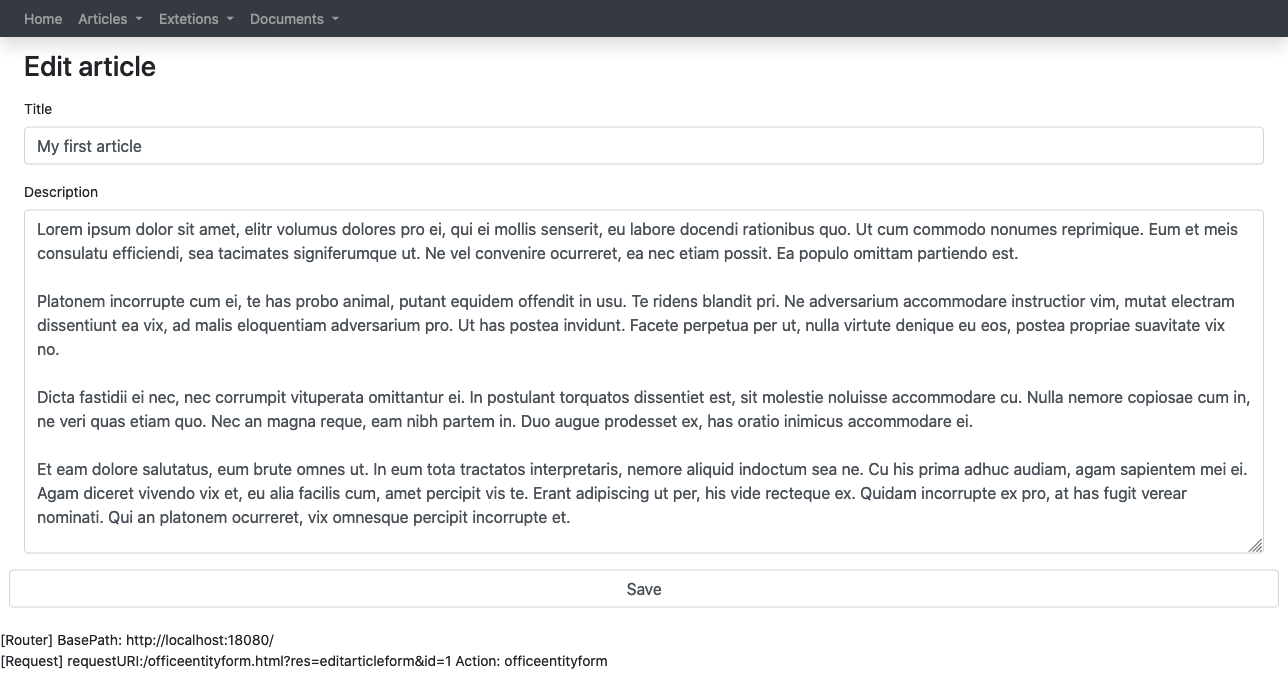
The table resource articles queries the database and shows to the authors a list of articles. For each of them it defines two actions. The first action refers to the resource editarticleform. This form allows the authors to modify an article previously inputed.
In this case too, only the users that belongs to group author can access to this resource, then we need to add to the allowedgroups array the group name author.
This form is composed by a get section and a post section that are very similar to the get and post section defined in newarticleform.
The get section contains a query that allows the system to load the data the author can edit in to the form. The query is: SELECT title, description FROM articles WHERE id = :id;.
As you can see this query has a parameter id that comes from get parameters sent to the page:
{ "type":"long", "placeholder": ":id", "getparameter": "id" }This parameter is linked to the request parameter:
{ "type":"long", "validation":"required|numeric", "name":"id" }The html form we are defined in the get section is composed by three fields:
- title: text field
- description: textarea
- id: hidden
At the end there is the submit button with the save label.
The get section this time is a little different from the one we created before. It contains a query that loads the data from the database: SELECT title, description FROM articles WHERE id = :id;. Those data are going to pre-populate the form
As you can see this query has a parameter id that comes from the get parameters sent to the page:
{ "type":"long", "placeholder": ":id", "getparameter": "id" }This parameter is linked to the request parameter:
{ "type":"long", "validation":"required|numeric", "name":"id" }The post section receives the post parameters sent by the form (title and description) sets the validations rules for those parameters and performs a query in the database in order to save the data.
Validation rules:
- name: required max_len,250
- description: alpha_numeric
- id: required integer
Query: UPDATE articles SET title = :title, description = :description WHERE id=:id;
Query parameters:
- title: post parameter
- description: post parameter
- id: post parameter
A complete example
{
  "name": "editarticleform",
  "metadata": { "type":"form", "version": "1" },
  "allowedgroups": [ "author" ],
  "get": {
    "request": {
      "parameters": [
        { "type":"long", "validation":"required|numeric", "name":"id" }
      ]
    },
    "query": {
      "sql": "SELECT title, description FROM articles WHERE id = :id;",
      "parameters":[
        { "type":"long", "placeholder": ":id", "getparameter": "id" }
      ]
    },
    "form": {
      "title": "Edit article",
      "fields": [
        { "type":"textfield", "name":"title", "label":"Title", "placeholder":"title", "width":"12", "row":"1" },
        { "type":"textarea", "name":"description", "label":"Description", "placeholder":"Description", "width":"12", "row":"2" },
		{ "type":"hidden", "name":"id", "sqlfield":"id", "row":"3" },
		{ "type": "submitbutton", "width":"2", "row":"3", "name": "Save", "constantparameter": "Save" },
      ]
    }
  },
  "post": {
    "request": {
      "postparameters": [
        { "name":"title", "validation":"required|max_len,250" },
        { "name":"description", "validation":"alpha_numeric" },
        { "name":"id", "validation":"required|integer" }
      ]
    },
    "transactions": [
      {
        "sql":"UPDATE articles SET title = :title, description = :description WHERE id=:id;",
        "parameters":[
          { "type":"string", "placeholder": ":title", "postparameter": "title" },
          { "type":"string", "placeholder": ":description", "postparameter": "description" },
          { "type":"long", "placeholder": ":id", "postparameter": "id" }
        ]
      }
    ]
  }
}
Create a transaction to delete an article
A transaction is a resource that change the status of the application without showing to the author (user) any interface. In this case we use it in order to add the delete article functionality to the application.
The table resource articles queries the database and shows to the authors a list of articles. For each of them it defines two actions. The second action refers to the resource deletearticlelogic. This transaction allows the authors to modify an article previously inputed.
In this case too, only the users that belongs to group author can access to this resource, then we need to add to the allowedgroups array the group name author.
The get section contains a transaction section that can contain one or more queries. In this case it contains: DELETE FROM article WHERE id=:id;.
As you can see this query has a parameter id that comes from the get parameters sent to the page:
{ "type":"long", "placeholder": ":id", "getparameter": "id" }This parameter is linked to the request parameter:
{ "type":"long", "validation":"required|numeric", "name":"id" }**.The complete code example:
{
  "name": "deletearticletransaction",
  "metadata": { "type":"transaction", "version": "1" },
  "allowedgroups": [ "author" ],
  "get": {
    "request": {
      "parameters": [
        { "type":"long", "validation":"required|numeric", "name":"id" }
      ]
    },
    "transactions": [
      {
        "sql":"DELETE FROM article WHERE id=:id;",
        "parameters":[
          { "placeholder": ":id", "getparameter": "id" }
        ]
      }
    ],
    "redirect": {
      "internal": { "type": "onepageback" }
    }
  }
}
Second part of the tutorial
IF you are interested you can keep reading: Pushing things a little further